In this second post about Excel Password Protection, we will discuss how to protect individual worksheet of an Excel workbook. There are many reasons why sometimes we need to password protect them but most of them are for keeping the content of the worksheet intact and unmodified, or keeping the confidentiality of the content, e.g. formula for profit margin, item cost, etc. from those who shouldn't be looking at them. Without so much bother, here are the ways to password protect your worksheets.
Making A Worksheet Read-Only
To protect your worksheet from alteration and to hide all the formula in all the cells by locking them by a password, all you have to do is choose the tab name of the worksheet. Highlight the whole worksheet by clicking the upper left cell header. Then on the menu click Format>Cells. The Format Cells window will appear. Click the Protection tab. It looks like the screen grab below:
There are two checkboxes, the Locked and Hidden checkboxes. The Locked is checked by default but the other one is not. The Locked is to make all the cells unmodifiable when you activate the worksheet password protection. The Hidden checkbox is to hide all the formulas of the cells. Check them both.
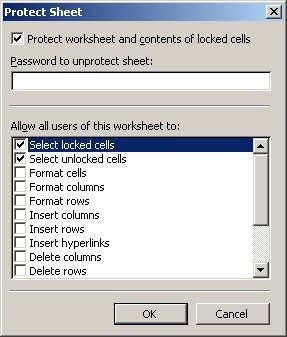
The next step is to activate the sheet protection. Go to Tools>Protection>Protect Sheet. You will see the Protect Sheet window as seen below:
The first checkbox you see should be checked to make the security active. The textbox below it is for the password. It is actually optional but what's the use of locked sheet without a password. Anyone can undo the protection when there's no password. So, you should put your password for total guarantee that it's safe.
Below the textbox, you can see a set of checkboxes. Most of the time, I didn't change the default value of them but there's no harm in exploring it. You can experiment on different combinations that you think appropriate to your needs.
When done, push the Ok button to complete the operation. Your worksheet is now read-only protected.
Making Other Cells Unlocked And Changeable
At the above procedure, you locked all the cells and made them unchangeable. But if you need to leave other cells in the worksheet unlock and available for user to alter them, it is also possible to do that. After locking all the cells, you can choose the cells that you want to be kept changeable and highlight them. Click again the Format>Cells at the menu. Choose the Protection tab. Uncheck the Locked checkbox and click Ok button. Activate the sheet protection.
Maybe you are asking, "Why do I have to do that; leaving other cells changeable?". At this level of discussion, it doesn't look like it make sense. Doesn't it? Allow me to give you an example. Let's say, you are making a data entry for a Purchasing Order form. You create a template of the form in Excel and you want the user or the buyer to use that Excel file to create the PO form for the company purchases. At this scenario, you can lock the sheet for the PO entry form to protect the layout from accidental changes and leaving only those fields for the entry of PO number, vendor, payment terms, delivery date, etc. open for user encoding. Do you get the idea?
There are so many things that you can do with the functions. The example I gave above is just one of them and it's a very simple one. Different applications with this is only a matter of how you use your imagination and creativity. I'm sure, you can think of something that you can do with it in you job or business.
Next post will be about Visual Basic protection. So keep the subscription and stay in the loop. To those who want to subscribe, it's for free. Just click here.


0 comments