If you wish to be listed in the permanent exchange links list, just embed this code in your site or blog. Email me afterwards and indicate the url where you put the my link for me to check. Your own link will be published in my list as soon as I check the presence of my link from your site. Below is my email address.
probusiness (at) gmail (dot) com
ProBusiness is inviting all Excel experts and Business Analysts out there to share your knowledge by contributing an article here. You can send your article through the email address at the bottom of this post. In return, if you have your own blog or website, I will give you a permanent link at the sidebar portion of this blog for free. The sidebar link appears on all pages of the blog and will give your site a maximum exposure.
Your article should be related to Excel, Excel VBA, or how Excel is used to any business function and analysis. If you wish to include pictures or graphic files to the article just attached it in the email. Maximum of 5 pictures are allowed. The picture size should be not more than 15kb each.
Your article will be published once approved. Approval will take 1-2 weeks as I do this job on weekend only. Your name or your website with link will be mentioned at the bottom of the post.
probusiness (at) gmail (dot) com
Below is the exchange links list that helps ProBusiness exists and expands in the cyberspace. If you want to be included here, just read the instructions from this link.
For any suggestion or complaint about the posts in this blog, please send a message at the email address below.
probusiness (at) gmail (dot) com
Advertise on Pro-business Excel VBA Programming Blog
125x125 Button Sponsorship
This button appears on every page that would give you more exposure not only on the readers but also on major Search Engines. It's a good way to start your link building here. The price is only $5 per month and pay by clicking the PayPal link below.
Link Sponsorship
As the button above, Link also appears on every page but located at the last part of the sidebar. The price is $1 per month and payment is through the PayPal link below.
Note: We are not going to discuss here the Consolidation function of Excel. The said function is used if you want to sum up multiple numbers from different Excel files that have same format into a single Excel file. I've got limited time to post to discuss it but will try to tackle it in the near future.
In this post, we will combine records from different files with different format. Appending them all in a single Excel file. No summation will be done.
Data Consolidation
Is it to much tedious if you copy and paste manually sets of data from multiple files and append them all together in a master file? Let's say you have 50 files of records and you open them one by one and copy the records and paste into a single file. And the most boring of all about it is that you need to do it over and over again in a weekly basis. Of course, you will agree with me that it is tedious.
If you find yourself in that situation and don't want to do the same thing manually weekly, then you can automate the whole process. The long hours of doing it manually can be reduced in an hour or two with a macro program.
Source Data
So let's start by creating the files to be combined together. For our example, we will create 3 different source files; an Excel file, CSV file, and a Tab delimited file.
Excel File -- Create a new Excel file and copy the data in the following screen shot and save as Excel file, of course :)
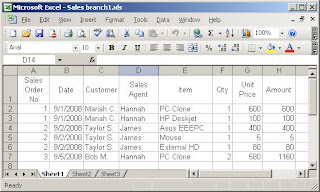
CSV File -- In Excel, copy the data in the following screen shot and save it in CSV format by clicking "Save As" in the File menu. Change the file type to CSV before clicking the Save button.
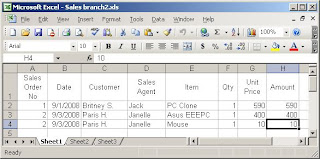
Tab Delimited -- In Excel, copy the data in the following screen shot and save it in Tab delimited text file by clicking the "Save As" in the File menu. Change the file type to "Tab delimited" before clicking the Save button.
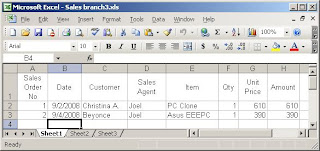
Recording Data Import
AT this point, we will extract records from the files that we created while we are macro recording it. To start the Macro Recorder, please see my post on how to do that at Easiest Way to Learn Excel VBA Programming by Macro Recorder. Once it is up and running, we will do the data extraction of the 3 files. But it is much better if you will start and stop the macro recorder for each file extraction so that each file will have its own procedure module. then we will examine each module one by one to learn the difference.
To extract the file, follow the instruction in my previous post, Export To Excel.
You should generate the same codes as below:
Source Code for Excel file.
Sub Macro1()
    '
    ' Macro1 Macro
    ' Macro recorded 9/14/2008 by Joel.Protusada
    '

    '
    With ActiveSheet.QueryTables.Add(Connection:=Array( _
        "OLEDB;Provider=Microsoft.Jet.OLEDB.4.0;" & _
        "Password="""";User ID=Admin;Data Source=" & _
        "E:\Consolidation\Sales branch1.xls;" & _
        "Mode=Share Deny Write;", _
        "Extended Properties=""HDR=YES;"";Jet OLEDB:" & _
        "System database="""";" & _
        "Jet OLEDB:Registry Path="""";Jet OLEDB:" & _
        "Database Password="""";Jet OLEDB:", _
        "Engine Type=35;Jet OLEDB:Database " & _
        "Locking Mode=0;Jet OLEDB:" & _
        "Global Partial Bulk Ops=2;Jet OLEDB:Global " & _
        "Bulk Transactions=1;Jet OL", _
        "EDB:New Database Password="""";Jet OLEDB:" & _
        "Create System Database=" & _
        "False;Jet OLEDB:Encrypt Database=False;Jet " & _
        "OLEDB:Don't Copy Locale", _
        " on Compact=False;Jet OLEDB:Compact " & _
        "Without Replica " & _
        "Repair=False;Jet OLEDB:SFP=False" _
        ), Destination:=Range("A1"))
        .CommandType = xlCmdTable
        .CommandText = Array("Sheet1$")
        .Name = "Sales branch1"
        .FieldNames = True
        .RowNumbers = False
        .FillAdjacentFormulas = False
        .PreserveFormatting = True
        .RefreshOnFileOpen = False
        .BackgroundQuery = True
        .RefreshStyle = xlInsertDeleteCells
        .SavePassword = False
        .SaveData = True
        .AdjustColumnWidth = True
        .RefreshPeriod = 0
        .PreserveColumnInfo = True
        .SourceDataFile = _
        "E:\Consolidation\Sales branch1.xls"
        .Refresh BackgroundQuery:=False
    End With
End Sub
Source code for CSV file.
Sub Macro2()
    '
    ' Macro2 Macro
    ' Macro recorded 9/14/2008 by Joel.Protusada
    '

    '
    With ActiveSheet.QueryTables.Add(Connection:= _
        "TEXT;E:\Consolidation\Sales branch2.csv", _
        Destination:=Range("A1"))
        .Name = "Sales branch2"
        .FieldNames = True
        .RowNumbers = False
        .FillAdjacentFormulas = False
        .PreserveFormatting = True
        .RefreshOnFileOpen = False
        .RefreshStyle = xlInsertDeleteCells
        .SavePassword = False
        .SaveData = True
        .AdjustColumnWidth = True
        .RefreshPeriod = 0
        .TextFilePromptOnRefresh = False
        .TextFilePlatform = 437
        .TextFileStartRow = 1
        .TextFileParseType = xlDelimited
        .TextFileTextQualifier = xlTextQualifierDoubleQuote
        .TextFileConsecutiveDelimiter = False
        .TextFileTabDelimiter = False
        .TextFileSemicolonDelimiter = False
        .TextFileCommaDelimiter = True
        .TextFileSpaceDelimiter = False
        .TextFileColumnDataTypes = Array(1, 1, 1, 1, 1, 1, 1, 1)
        .TextFileTrailingMinusNumbers = True
        .Refresh BackgroundQuery:=False
    End With
    Sheets("Sheet3").Select
End Sub
Source code for the tab delimited file.
Sub Macro3()
    '
    ' Macro3 Macro
    ' Macro recorded 9/14/2008 by JPCORP
    '

    '
    With ActiveSheet.QueryTables.Add(Connection:= _
        "TEXT;E:\Consolidation\Sales branch3.txt", _
        Destination:=Range("A1"))
        .Name = "Sales branch3"
        .FieldNames = True
        .RowNumbers = False
        .FillAdjacentFormulas = False
        .PreserveFormatting = True
        .RefreshOnFileOpen = False
        .RefreshStyle = xlInsertDeleteCells
        .SavePassword = False
        .SaveData = True
        .AdjustColumnWidth = True
        .RefreshPeriod = 0
        .TextFilePromptOnRefresh = False
        .TextFilePlatform = 437
        .TextFileStartRow = 1
        .TextFileParseType = xlDelimited
        .TextFileTextQualifier = xlTextQualifierDoubleQuote
        .TextFileConsecutiveDelimiter = False
        .TextFileTabDelimiter = True
        .TextFileSemicolonDelimiter = False
        .TextFileCommaDelimiter = False
        .TextFileSpaceDelimiter = False
        .TextFileColumnDataTypes = Array(1, 1, 1, 1, 1, 1, 1, 1)
        .TextFileTrailingMinusNumbers = True
        .Refresh BackgroundQuery:=False
    End With
End Sub
As you can see there are almost no difference between the CSV and Tab file. So in our programming we will modify the codes above and we will create a single subroutine to handle both CSV and Tab files, and a separate subroutine for Excel files.
Project Details
Before we start with the actual programming, we need to be precised in the parameters of our consolidation. Below is the brief specifications of it:
- To trigger the consolidation, an option in the menu should be added to run it. To do that visit my post Create Customize Excel Menu.
- All the files to be consolidated should be residing in the same folder as the master file. The master file is an Excel file that will serve as the repository of all the records. It also has the consolidation macro program.
- There will be only three data file formats to be recognized by the program; Excel, CSV, and tab delimited. If there is a need for other format, you can easily modify the program that we will make here.
- program should follow the flow chart below:

Modified Macro Program
As I've said we will modify the code above to subroutines that we can use and reuse in our programming. Below is the modified recorded macro for the Excel file extraction:
Sub ExtractExcelData(strPath As String, _
strFile As String, strSheet As String)
Sheets(strSheet).Select
With ActiveSheet.QueryTables.Add(Connection:=Array( _
 "OLEDB;Provider=Microsoft.Jet.OLEDB.4.0;" & _
 "Password="""";User ID=Admin;Data Source=" & _
 strPath & strFile & ";Mode=Share Deny Write;", _
 "Extended Properties=""HDR=YES;"";Jet OLEDB" & _
 ":System database="""";Jet OLEDB:Registry Path="""";Jet OLEDB" & _
 ":Database Password="""";Jet OLEDB:", _
 "Engine Type=35;Jet OLEDB:Database Locking Mode=0;" & _
 "Jet OLEDB:Global Partial Bulk Ops=2;" & _
 "Jet OLEDB:Global Bulk Transactions=1;Jet OL", _
 "EDB:New Database Password="""";Jet OLEDB:" & _
 "Create System Database=False;Jet OLEDB:" & _
 "Encrypt Database=False;Jet OLEDB:Don't Copy Locale", _
 " on Compact=False;Jet OLEDB:Compact Without Replica " & _
 "Repair=False;Jet OLEDB:SFP=False" _
 ), Destination:=Range("A1"))
 .CommandType = xlCmdTable
 .CommandText = Array("Sheet1$")
 .Name = "Sales branch1"
 .FieldNames = True
 .RowNumbers = False
 .FillAdjacentFormulas = False
 .PreserveFormatting = True
 .RefreshOnFileOpen = False
 .BackgroundQuery = True
 .RefreshStyle = xlInsertDeleteCells
 .SavePassword = False
 .SaveData = True
 .AdjustColumnWidth = True
 .RefreshPeriod = 0
 .PreserveColumnInfo = True
 .SourceDataFile = strPath & strFile
 .Refresh BackgroundQuery:=False
End With
End Sub
To test the above procedure, the correct parameters should be supplied like the example below:
Sub TestExtractExcelData()
ExtractExcelData "E:\consolidation\", "Sales branch1.xls", "sheet4"
'Parameters are:
'strPath - folder where to get the file
    'strFile - Excel filename of the source data.
    'strSheet - woeksheet where to put the data.
End Sub
Here's the subroutine for the CSV and Tab files extraction:
Sub ExtractTextData(strPath As String, _
strFile As String, strSheet As String, isCSV As Boolean)
Dim MyRecords
Sheets(strSheet).Select
If isCSV Then
   Set MyRecords = ActiveSheet.QueryTables.Add(Connection:= _
   "TEXT;" & strPath & strFile, Destination:=Range("A1"))
Else
   Set MyRecords = ActiveSheet.QueryTables.Add(Connection:= _
   "TEXT;" & strPath & strFile, Destination:=Range("A1"))
End If
With MyRecords
   .Name = Left(strFile, Len(strFile) - 4)
   If isCSV Then
       .TextFileCommaDelimiter = True
       .TextFileTabDelimiter = False
   Else
       .TextFileCommaDelimiter = False
       .TextFileTabDelimiter = True
   End If
   .FieldNames = True
   .RowNumbers = False
   .FillAdjacentFormulas = False
   .PreserveFormatting = True
   .RefreshOnFileOpen = False
   .RefreshStyle = xlInsertDeleteCells
   .SavePassword = False
   .SaveData = True
   .AdjustColumnWidth = True
   .RefreshPeriod = 0
   .TextFilePromptOnRefresh = False
   .TextFilePlatform = 437
   .TextFileStartRow = 1
   .TextFileParseType = xlDelimited
   .TextFileTextQualifier = xlTextQualifierDoubleQuote
   .TextFileConsecutiveDelimiter = False
   .TextFileSemicolonDelimiter = False
   .TextFileSpaceDelimiter = False
   .TextFileColumnDataTypes = Array(1, 1, 1, 1, 1, 1, 1, 1)
   .TextFileTrailingMinusNumbers = True
   .Refresh BackgroundQuery:=False
End With
End Sub
Here's the code to test it.
Sub TestExtractCSVData()
ExtractTextData "E:\consolidation\", _
"Sales branch2.csv", "sheet5", True
End Sub

Sub TestExtractTabData()
ExtractTextData "E:\consolidation\", "Sales branch3.txt", _
"sheet6", False
End Sub
'Parameters are the same as in the Excel routine.
'The fourth parameter is a boolean type which
'means that if the TRUE, it is a CSV file,
'otherwise Tab file.
So there you go. Those are the codes to do it. I will post soon the whole VBA program as it is too long to include it here.
This is the first part of our discussion on how to export data to Excel. We will start with the simplest one; how to transfer data from a flat file (CSV, Tab delimited, PSV, etc.) to Excel. Let's know first what is a flat file...
What is a flat file?
Wikipedia described it best...
A flat file is a file that contains records, and in which each record is specified in a single line. Fields from each record may simply have a fixed width with padding, or may be delimited by whitespace, tabs, commas (CSV) or other characters. Extra formatting may be needed to avoid delimiter collision. There are no structural relationships. The data are "flat" as in a sheet of paper, in contrast to more complex models such as a relational database.In short it's an ordinary file that stores records in sequential order.
This simple pattern of records saved in a file makes it possible for Excel to extract them and load into worksheet cells. A function is available in Excel to do it with a wizard tool.
Export To Excel
1.) Before we can export records to Excel, we need to have source file. So, let's create one by opening Windows Notepad and enter the set of data exactly as shown in the screen grab below:
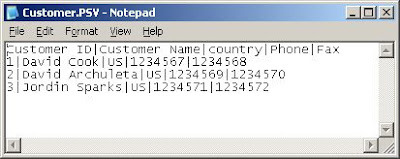
The sample records I created are list of customers. Each field should be separated by a Pipe ("|") character. After entering the string above, save the file. In my case, I named it Customer. The filename would have a .TXT extension, but since our data is pipe delimited, we should rename the extension to .PSV (Pipe Separated Value). We have now Customer.PSV.
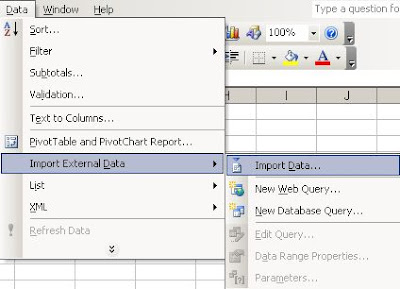
2.) Create a new Excel worksheet. On the menu, click Data>Import External Data>Import Data as shown below:
3.) This will bring out the Select Data Source window:
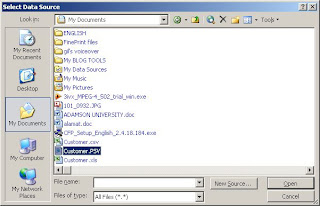
In this window, you will see many choices in the "Files of type" pull down list but you need only to choose All files (*.*) because PSV format is not included in the list. Locate the Customer.PSV then double click it.
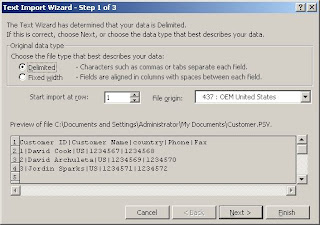
4.) The Text Import Wizard appears as shown below. Do not change the default Delimited in the Original data type as our records are delimited by a pipe character. Click Next button.
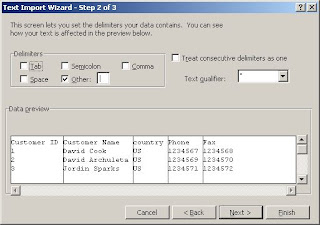
5.) The second screen of the wizard appears. Check the Other check box and put a pipe in the text field next to it. See below how. Then click Next button.
6.) The third screen of the wizard appears (see below). Here you usually indicate the data type of each column. But in the case of our sample records, we will just click Finish button.
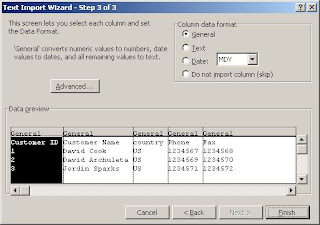
7.) The Import Data window pops out, choose Existing worksheet since we juist created a new one and click Ok to store all the records in the worksheet as shown in the screen grab below:
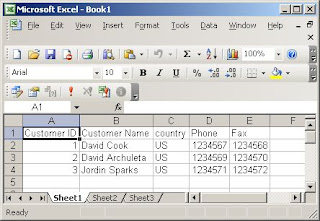
We are done.
Now you know how to export records from a text file into Excel and having these records in the worksheet you can now manipulate the data the way you want. You can pivot them to summarize and come up with useful information, or you can consolidate them with other data extracted from other source, etc.
In my next post, we will discuss consolidation of records from different files using VBA programming.
Happy Weekend :)